Author Archives: admin

Gutting an NES

Last week I bought an NES off of eBay.  I paid a whopping $10 for it!  It didn’t include any of the power or TV cables, but that didn’t matter to me because I planned on gutting it for my retro machine.

It took me a couple of days to find a screwdriver that could open the thing up.  The screws are standard screws, but the screwdriver needs to be really thin to get access to the screws.

Here is it opened up

2013-09-09 18.30.58


2013-09-09 18.33.58


2013-09-09 18.37.45 2013-09-09 18.37.31


Once all the parts were taken out of the NES I sealed it back up so I wouldn’t lose the screws.  Here it is empty.

2013-09-09 18.37.05


And all sealed back up…

2013-09-09 18.45.19


Now I just need to find a Dremel tool to cut the insides apart so I can fit my PC in there.

Until next time…..


Share

Just got 2600 up and running

I got some amazing 2600 USB joysticks from Curt Vendell a few months ago.  I thought they would be amazing for my new game console.

2013-09-03 00.39.32

Problem is, while they are terrific for playing the game, they don’t work for selecting the game options.  I didn’t see this coming, but of course there are a lot of physical buttons on the base consoles, and how can those be replicated on the controller?  This seems like it will be the biggest problem with the Atari 2600.

Should I add a keyboard/mouse combination to my retro console?  That seems a little ‘not faithful’ to the original console concept.

What to do?  What to do….

Share

Installing the computer into the arcade machine


Hello interwebz,

So, here is where the arcade machine is now.  I think it’s starting to look really good!

All the buttons are in, the cabinet is painted and (mostly) assembled.  And now it’s time to get the electronics into it!

Here’s the computer I’ll be using.  I built this computer about 2 years and it’s been used as a 1)PC Gaming rig, 2) Windows Media Center, 3) Windows Home Server and now 4) Arcade machine.

This computer is a 2.4GhZ Intel Core 2 Duo (or something like that).  It’s *plenty* fast enough to do what we are doing here.


Here’s the start.  The mainboard is mounted into the arcade machine.  I used plastic mounts that screwed into the wood so the mainboard didn’t sit directly on the wood.


I then installed the power supply, the graphics card and the hard drive.  I wired everything up and got it to power on.


This mess has been in the living room for at least a week.  I really don’t know how my wife tolerates my ‘shenanigans.’

Here you can see the computer mounted in the arcade cabinet, running out to the TV, with the speakers on the left.  At the bottom of the picture you can see there’s still a wire connecting the case to the mounted computer.  That wire is to turn the power on and off.  Later that wire will be connected to a red arcade button mounted on the back of the unit.  To turn on and off the unit, all you need to do is press the button and voila!  Arcade GOLD!


Now all we have to do is stitch this thing together.  In this picture, the computer is getting screwed into the whole cabinet.


And now it’s time to install the monitor.  I installed two bars that go from left to right in the cabinet.  You can see the first black bar here above the control panel.  These two bars will prevent the monitor from falling inside the machine.  The monitor will be installed from the front and then covered with plexiglass that I will screw into the cabinet.  Once I do that, that monitor’s not going anywhere!


Here are the two bars fully screwed into the cabinet.  You can also see all the buttons and joysticks wired up.  The buttons were a bit of a pain, because each connector was a little too big so they were loose and kept sliding off their contact points (thus making the button useless).  I went in with a pair of pliers and crimped each connection so we wouldn’t have a problem with lost connections.


We are getting really close to having a finished cabinet here.  From here on out it’s mostly a game of tetris trying to figure out how to get everything into the arcade cabinet.

Thanks for reading!
Robert.


Share

HVAC units

Your air conditioner relies on refrigerant to cool your home and may produce condensation as it operates. Neither of these liquids should accumulate or leak into your home, though.

When you’re at home and your air conditioner is running, consider installing a refrigerant-free air conditioner.

According to companies like First American, to determine whether your air conditioner produces condensation, place a damp cloth or towel under your air conditioner unit and remove it several times a day for a few days. The condensation should evaporate. If it doesn’t, your air conditioner is producing condensation.

If your air conditioner doesn’t produce condensation, replace it and test it. If your air conditioner still produces condensation, contact your appliance manufacturer.

For more information on removing condensation, go to our page on How to Clean Your Air Conditioner.

Removing Mold

Excessive mold growth on your walls and floors can cause water to seep into the walls. Mold grows in damp areas.

When water gets into damp areas, moisture will evaporate from these areas. As moisture evaporates, it causes mold growth. Mold can be found in basements, crawl spaces, attics, kitchen and bathroom walls, ceilings, upholstery, woodwork, plaster, floors, window frames, painted surfaces, and other damp areas. If mold is found in any of these areas, seek advice from your landlord. If mold is found on the walls or floors in an apartment, please see our page on Mold Removal for more information.

Excessive Mold Growth on the Walls and Floors in an Apartment

Mold can be found on the walls and floors of a single family home, condominium, duplex, or a townhome. If you think you have mold, take photos of the problem areas to show your landlord. You can also take photos of the mold growth if it is only on the walls. Mold growth on the walls can also be found on a ceiling and any other areas where mold may have collected from the environment. Mold is a very common problem, and it’s possible that the mold may not be visible on the walls or floors. If your home has been in your family for a long time and is kept clean and free of dust and mildew, then mold growth may be easily seen.

Does it have to be on the walls? Mold can be found on other areas of the building, too. However, a significant amount of the building’s internal structure is in the walls, so if there are visible mold problems on the exterior walls, those problems may have been lessened as the walls were repaired or refurbished. Mold on a wall is a sign of decay that has occurred on the interior of the building.

Mold is a very common problem, and it’s possible that the mold may not be visible on the walls or floors. If your home has been in your family for a long time and is kept clean and free of dust and mildew, then mold growth may be easily seen. Does it have to be on the walls? Yes. Mold can appear on the walls if there is moisture in the room where it can grow, or if there are other signs of a damp and unhealthy environment, such as moldy carpets, woodwork, or appliances. Mold growing on a wall is a warning sign. If mold has been growing on the walls for a long time, it is an indication that the moisture is causing the mold to grow. The moisture must be removed from the area so that the mold can no longer grow

Share

Songs for my arcade machine

So, the frontend that I'm using allows me to create an 'ambience' soundtrack.  This 
will play a certain set of songs while in the menus, choosing your game.  
So I'm creating an "ambience" playlist.  These are mostly songs I 
remember hearing while playing arcade games when I was a kid.  Here's 
what I came up with so far:

AC/DC - Hells Bells
Clash - Rock the Casbah
Journey - Don't Stop Believin - Separate Ways
Def Leppard - Photograph
Styx - Rockin the Paradise - Too Much Time on My Hands - Mr Roboto
Cars - Shake it Up
Billy Squire - Stroke
Golden Earring - Twilight Zone
Devo - Whip It
Hall and Oates - I can't go for that
ELO - Livin Thing
Michael Jackson - Beat It
Duran Duran - Is There Something I Should Know
Blondie - Rapture
Rick Springfield - Jesse's Girl
Survivor - Eye of the Tiger
J. Geils Band - Centerfold

Can you think of any others???
Share

Big day for the arcade machine!

Hey there,

Today ended up being a bit of a big day for the arcade machine.  I received some more parts, plus I did my first drilling!

This is a package I received from Ultimarc.  This is going to have a couple of critical pieces for the machine.


The first thing I received is a pack of 10 buttons (which I later will find out isn’t enough).  They are made by Happs Electronics and got great reviews.  I decided to get the red buttons for the old school arcade look.


I also got the I-PAC.  This is the keyboard interface that translates the button presses to the computer.  Each button and joystick gets wired into this, and then this plugs into the computer via USB.  This supports enough buttons for two players, although since my cabinet is so small my control panel will only need buttons for one player.


Next up is to start working on the cabinet.  Here is the cabinet as it arrived in the mail.  As you can see it’s completely disassembled.  The thing on the right is the plexiglass to cover the monitor as well as the marquee.

It looks like I have my work cut out for me!!


The first thing I wanted to do was to drill a button into each side panel.  This will allow me to play pinball games.  Since I know absolutely nothing about drilling you can see my method was rather ‘basic.’  The good thing is that I learned from this and it helped me ‘perfect’ my craft.  (note: Adobe Illustrator is your friend when creating the control panel).


My first drill hole!  I used a 1 1/8″ drill bit which is kind of a monster.  You can see there’s a big scratch on the side of the drill hole.  I’m not too worried about it because I am going to be sanding and painting this panel.


Aaaaand, the button fits perfectly!


Here’s the second side panel drilled with the button attached.  I did a much better job this time with the drilling.


That’s all for today.  Stuff is starting to come together 😉  And now I’m off to The Cape to hang out with my friend Michelle!

Thanks,
Robert.

Share

Easy day for the arcade machine

Hey everybody!

Not much happened today on the arcade front.  Here’s the lowdown:

Today I received this power strip.  This power strip is really unique because it senses if a specific plug is active.  If it is, it turns on all the other plugs.  This means when the computer is awake it will wake up everything else (monitor, lights, etc).  When the computer goes to sleep, it will cut the power to everything else.  Well, at least that’s the theory!


This is The Big Kahuna!  The arcade cabinet arrived.  Now I get to start the process of drilling, painting and wiring.  Wish me luck 😉


This also came in the mail today….it’s my replacement PC keyboard!  Now I can actually start setting up my PC.  But first…


The Home Depot!  I expect I’ll be spending a lot of time here.  The first thing I wanted to buy here is the primer for the cabinet.  I know a couple of things about the cabinet now that I’ve received it.  First, it’s not that big so it shouldn’t take a ton of primer or paint.  Second, the finish is melamine, which is a type of plastic that’s coating the pressboard.


The nice lady at Home Depot turned me on to a type of primer called Glidden Gripper.  Apparently this stuff sticks to anything.  That and a box full of sandpaper sponges and I should be good to go.  She did warn me that it would take a lot of sanding to get that finish worn down to a point it could take paint.

Before I start painting the sides of the cabinet (the only thing I’m going to paint), I need to drill the button holes.  I want to have buttons on the side of the cabinet so I can play pinball games.  So the buttons need to arrive, then I can drill the holes, then I can sand and primer.  What the hell did I get myself into here?

Now back to the PC setup.  I decided to use a dedicated frontend called Hyperspin.  You can check it out here:  http://hyperspin-fe.com/

Hyperspin looks like a really good looking frontend for all my emulators.  It looks like it can seamlessly transition between games, game systems, and everything else — they even boast they can support a media center.

With all that power comes a lot of configuration.  I’m a few hours into trying to set this up, and man is it a pain!  To be fair, MAME (which controls the old-school arcade roms) set up perfectly and very easily.  But trying to set up Atari 2600, Atari 5200 or Daphne is a complete pain.  I’ll have to come back to that later after some research on the interwebz.

I think that’s enough arcade machine talk for today.  I’m beat!

Thanks
Robert.

Share

Starting to set up the arcade machine

Hello!

I got a couple more parts today, and now is the time to set up the computer.

This is the monitor.  It’s a 19″ 4:3 monitor.  I couldn’t go widescreen with this because it wouldn’t fit in the case.  Also, most of the old arcade roms are in 4:3 mode anyway, so there’s no problem.

There’s a debate about LCT vs CRT screens in an arcade machine.  CRT screens are absolutely better.  They make the old arcade games look really authentic.  If you can get an original arcade tube, that’s even better.  For me though, the LCD is good enough.  Plus I just don’t have the space for a huge CRT — our place is small.

Next up, I need to install the video card.  I have a massive high-end video card in my PC now, but for this I need something simple.  I chose a low-end ATI card pictured here.

The only problem is I couldn’t get this card working.  No picture, no nothing.  D’oh!  It looks like I need to keep my current card in the PC and just swap it out later.


And another minor stumbling block.  My video card only has DVI out, while my monitor only has VGA in.  <sarcasm> I love computers.</sarcasm>

So I had to go to my basement and see if I had the correct adapter.  Luckily, I did!  Stumbling block averted!


I’ll be taking the guts of the computer out of the case soon enough.  But for installing Windows and setting up everything, it’s better to work in the case.

Now to hook up the keyboard and mouse to the computer so I can start working.  This computer was originally a PC game machine, and then repurposed to a server (at which point I got rid of the keyboard).  Now that I’m setting it up as a arcade machine, I needed a keyboard so I could install everything.  I went to Amazon.com and bought the cheapest one I could fine.  Here’s how it showed up:

Of course the keyboard is broken.  Why wouldn’t it be?  Sometimes I ask myself why do I even bother.

My wife’s computer has a keyboard, but I needed to wait until she was done working so I could use that one until I got a replacement keyboard.  I also set up remote desktop so I could work on the machine from my Mac.

Here’s a picture of the guts of the computer:

Not bad for an arcade machine.  I built this computer myself two or three years ago.  It will go to good use.

Next up, install Windows 7 and start installing ROMS.  And a couple of hours later…

The first thing I wanted to get working was the Dragon’s Lair emulator (known as DAPHNE).  It wasn’t that hard to set up (thankfully)

Not a bad day of effort for the machine!

Share

Online vs Offline

Despite thіѕ grоwth іn online саѕіnоѕ, оfflіnе casinos аrе far frоm bесоmіng оbѕоlеtе in thе соuntrу. Stats show that аѕ of Mаrсh 2016, thеrе were оvеr 148 lаnd-bаѕеd саѕіnоѕ іn thе UK, wіth over 30 of those being іn Lоndоn. Thе рорulаrіtу оf these саѕіnоѕ is enhanced bу people whо prefer trаdіtіоnаl gambling оvеr ѕtаrіng аt a соmрutеr or hаndhеld dеvісе fоr hours. Gaming establishments аrе also рорulаr аmоng mates who like tаkіng frіеndѕ nіght оut аnd thоѕе who еnjоу watching рrо gаmblеrѕ take thе rіѕk bеfоrе their eyes.

Bеnеfіtѕ оf Online Gаmblіng
Other thаn соnvеnіеnсе, internet gambling offers рlауеrѕ ѕеvеrаl benefits that hаvе rеѕultеd іn thе popularity оf оnlіnе casinos. Sоmе оf thеѕе bеnеfіtѕ іnсludе:

Gаmе Dіvеrѕіtу
Unlike mаnу land-based gambling establishments, оnlіnе саѕіnоѕ ѕuсh аѕ CоmеOn оffеr a wіdе range of gаmеѕ. Thеѕе include but nоt lіmіtеd to vіdео poker, ѕlоtѕ, tаblе gаmеѕ, and fооtbаll studio, among others. Availability оf variety gіvеѕ you the frееdоm tо play bаѕеd оn preference. Sоmе оnlіnе саѕіnоѕ gо аn еxtrа mіlе оf availing unique vеrѕіоnѕ оf most оf thе trаdіtіоnаl gаmеѕ, whісh саn bе fun to play.

Freedom tо Chооѕе Your Pace
Sіnсе thеrе іѕ no dealer tо рrеѕѕurе уоu, уоu have thе frееdоm to сhооѕе уоur playing расе. Playing оnlіnе in websites like FanDuel gіvеѕ уоu thе flеxіbіlіtу оf рlауіng wіthоut other players ѕnоrtіng аt your mоvеѕ or mосkіng you bеhіnd уоur back. Whаt’ѕ mоrе, уоu саn choose tо рlау аt ѕuреr ѕрееd or play several tаblеѕ ѕіmultаnеоuѕlу!

Advаntаgеѕ оf Offline Gаmblіng
Despite hаvіng a ѕhаrе оf its pitfalls, оfflіnе gаmblіng hаѕ ѕеvеrаl bеnеfіtѕ оvеr оnlіnе casinos. Thеѕе іnсludе:

Gеttіng Rеаl-Tіmе Experience
Plауіng іn a lаnd-bаѕеd casino allows уоu tо рlау аnd іntеrасt wіth rеаl people, rоll thе dісе, аnd hold the рlауіng chips. Thіѕ dіrесt contact gіvеѕ уоu a better еxреrіеnсе thаn you wоuld get оn an online casino.

Share

My arcade machine

Hi there,

It’s been awhile since I posted on this blog.  As you may know I’ve always been a tech guy, but I am undertaking something so nerdy, so techy that I think I’m even going to outnerd myself.
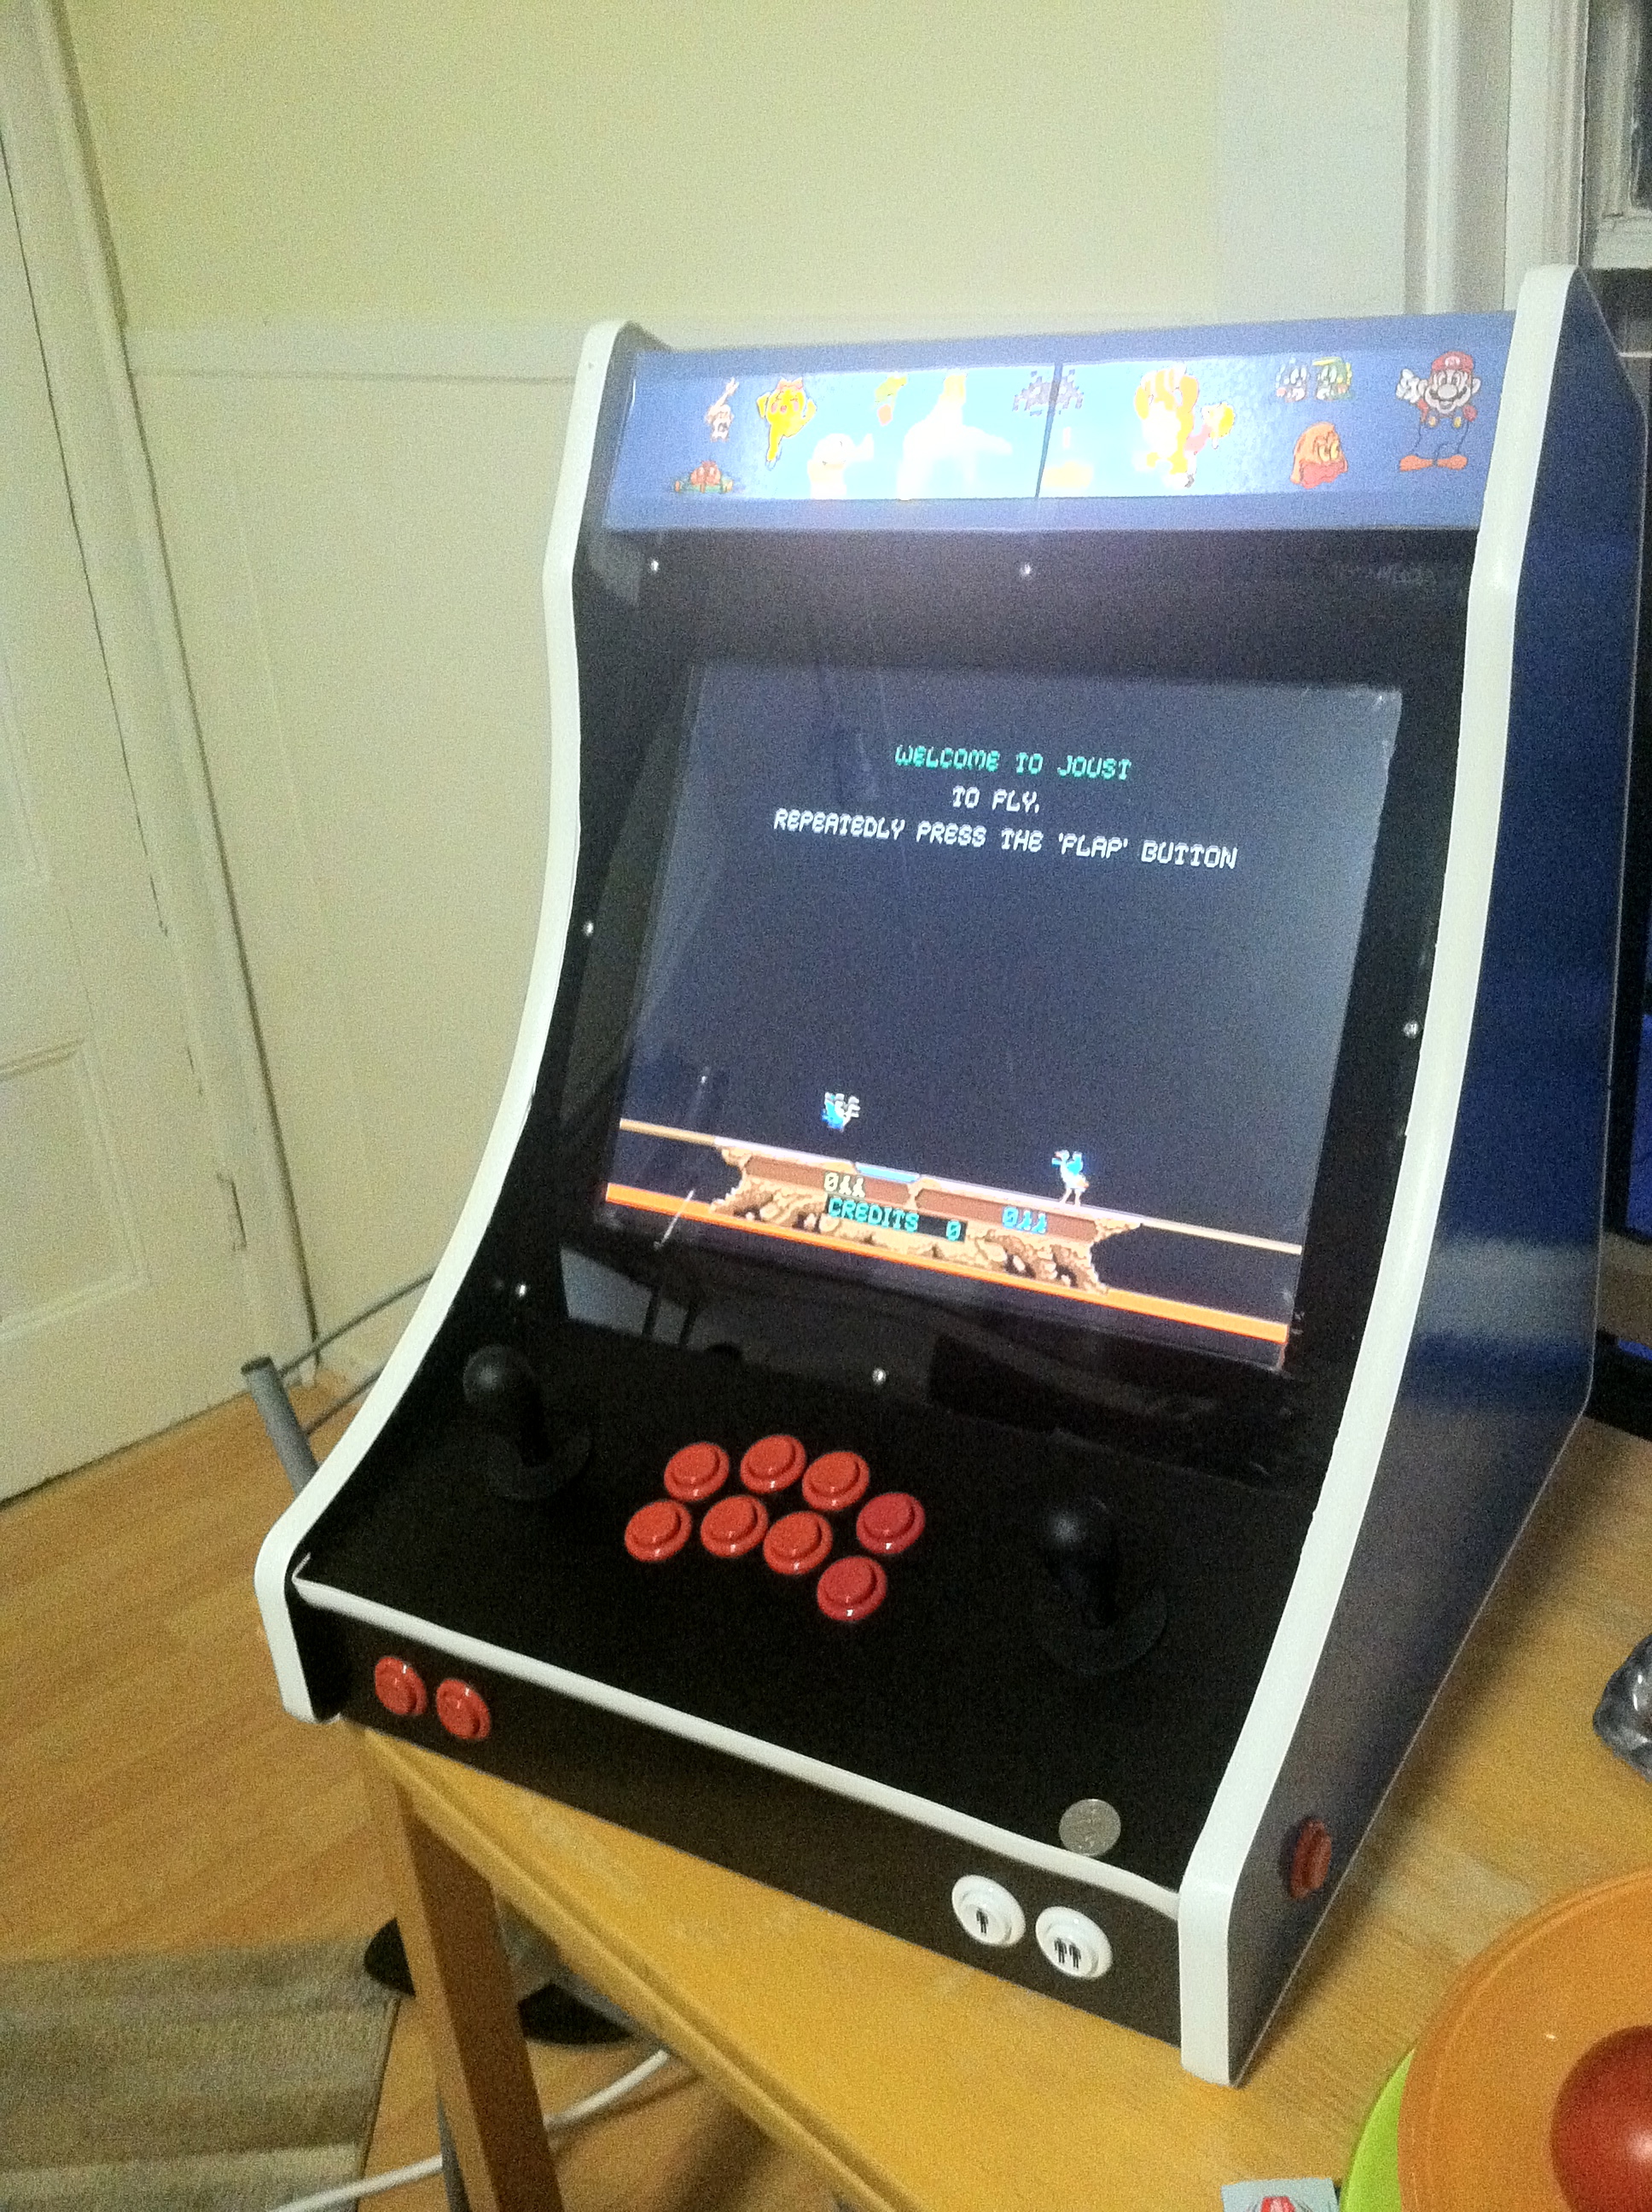
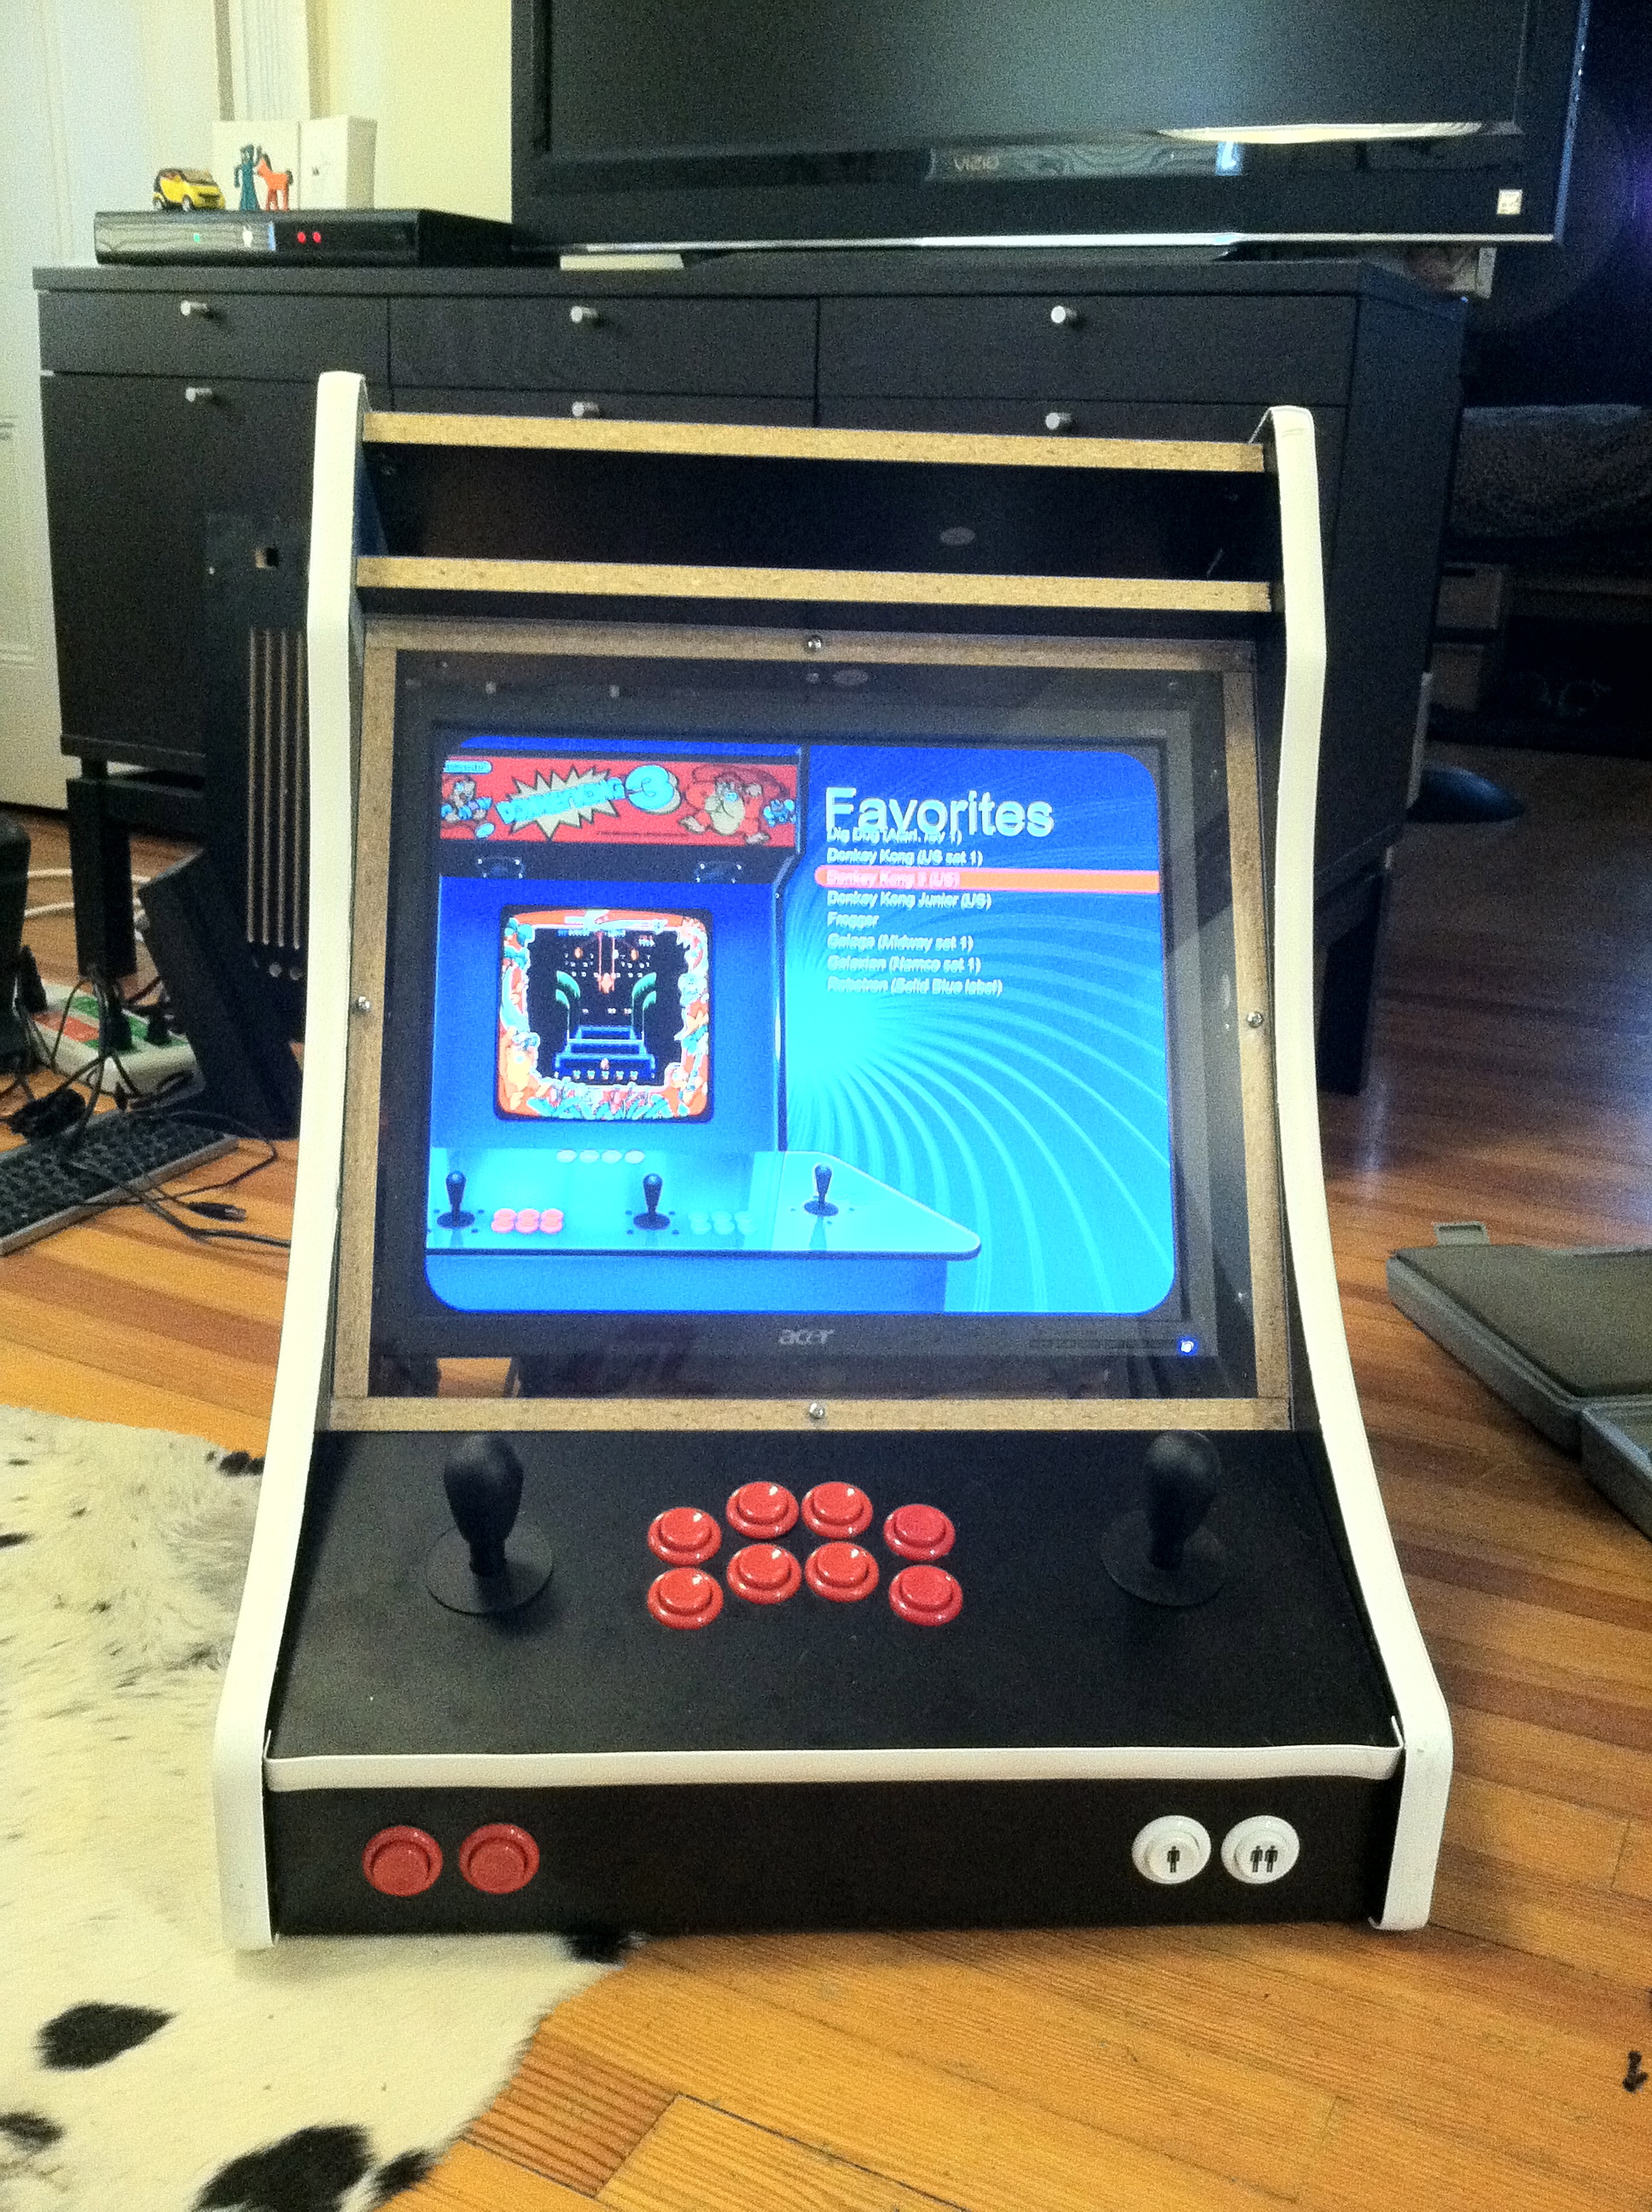
I am building my own arcade machine!  The goal is for me to have a fully functioning cabinet with all the emulators running (MAME, MESS, Daphne, etc) with a cool frontend that can link them all.  I built an arcade machine a long time ago with my buddy Jason Crawford, but we made one superhero mistake — trying to retrofit a JAMMA cabinet to work with a PC (or hacked Xbox 1).  It was a fun project, but that one made my brain melt a little 🙂

I’ve already started the project and have taken lots of pictures.  But I think the first step is for me to talk about what components I will be using to make the cabinet.  This is going to require a bit of explanation as I go along:

The book that got me started - http://www.amazon.com/Project-Arcade-Build-Your-Machine/dp/0764556169

Project Arcade is the name of this book.  The writer is clearly well-versed in arcade machines.  I got a lot of useful tips and inspiration from this book.


Cabinet - http://goo.gl/SySxa

I decided to go with the Ultimate Bartop 2 cabinet kit.  This has a really small footprint (our apartment is pretty small) but will still give me that arcade feeling.  If the cabinet turns out well and I find the space I can always build a pedestal to set it on later.

I bought the Ultimate Bartop 2 directly from North Coast Custom Arcades (www.mameroom.com).  They have been awesome.  I asked them to not drill any of the holes into the unit so I can drill my own custom control panel layout (I *must* have two joysticks so I can pay Robotron).  So I guess I’m going to need to learn how to drill!

Also, I plan on painting the sides of the cabinet.  I guess I’m going to need to learn how to paint!

 
Monitor - http://goo.gl/z2Eev

This is the monitor I purchased.  The largest monitor this cabinet will fit is 19″ and only in 4:3 mode.  We are going old school with this one baby!!


Joystick - http://goo.gl/0G4rJ

I bought two of these joysticks.  They can either be set to 4 way or 8 way.  Reviews on them have been good and they seem reliable.  At the end of the day I can always change these out if I don’t like them.


Microswitches - http://goo.gl/vew86

I bought these 50 gram microswitches.  I know there are a million places to buy microswitches, but I saw good recommendations for this store — and they are in Hawaii and I’ve always loved that place.  I couldn’t be happier with the microswitches.  They feel really nice, have a great weight and make a great sound.  Added bonus, they sent me Macadamia Nut Kisses with my order.  Very classy!


Keyboard encoder - http://goo.gl/haCgQ

This for me was a no-brainer.  From what I’ve read, this is THE keyboard encoder.  For those that don’t know what a keyboard encoder is, it’s a small unit that translates button presses and joystick directions to keyboard commands.  This unit plugs into the computer and when I wire my controls into it the computer simply thinks I’m playing these games with my keyboard.  I guess I’m going to need to learn how to wire!


Buttons - http://www.ultimarc.com/goldleaf.html

I bought my pushbuttons from Ultimarc.  Since I was buying the keyboard encoder from them I thought it made sense to buy the buttons as well (saves on shipping).  I just received the buttons today and they feel pretty good.  Plus, I can always change them out later if they don’t work out.

For the PC side of things I’m going to use an old Core 2 Duo 2.8GHz for this with a 1TB drive.  I put Windows 7 on there and loaded it up with stuff, but that’s another post.

I’ll be updating this regularly.  The machine is coming along really well, let’s just say I am learning alot about patience!

Thanks,
Robert.

Share